
|
Today's Digital Tool Tuesday comes to you as a result of a morning in which my patience was tested and I had to repeat the mantra, "If at first you don't succeed, try, try again" (and again, and again). I was creating a Google Slides presentation on how to connect a Chromebook to the projector, and I wanted to use GIFs to give a good nonlinguistic representation of how to do the steps (What is a GIF? See image below!).
I read several blog posts and did several Google searches on GIF creators, but everything that I tried would not work the way I needed it to. I needed to put the GIFs in Google Slides, which you do by going to Insert --> Image --> By URL, and then you paste the URL of the GIF in the box. The GIF creators I found downloaded the GIF, rather than give me a URL, or they just plain glitched out on me. Around and around I went, until VICTORY! I found one that did what I needed it to do.
Gifs.com. Yes, really, it's that simple! GIFs.com let's you turn videos into GIFs. You can upload your own video (I was able to do use the shareable link of a video from Screencastify to make the above GIF), or just copy and paste a YouTube video into the site and go from there.
It lets you adjust the length of time of your GIF and add features like a title.
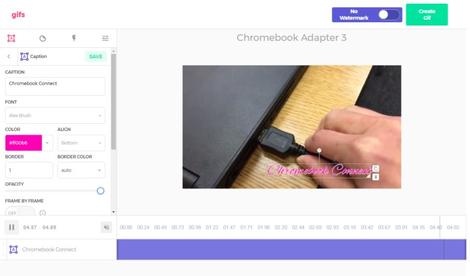
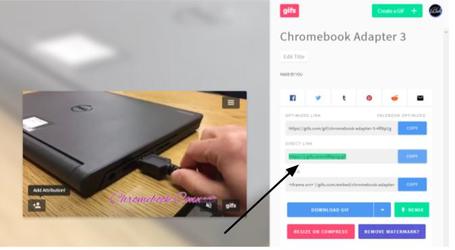
Once you are done editing, you get a Direct Link, which you then can copy and paste into Google Slides (or Docs, or Drawings) under Insert --> Image --> By URL.
So how can you use GIFs in your classroom?
0 Comments
Tech is shiny. Tech is cool. Tech is 21st century. It's easy to get swept away and think, "Look at me, I'm using technology!" But is the tech we're using tied to learning objectives? Are we leading students down the path to learning, or are we just putting shiny things in front of them and calling them "engaged"? We can do this with other learning activities as well. Anything fun and engaging may seem beneficial to student learning, but as teachers we have to make sure that the objectives come first. 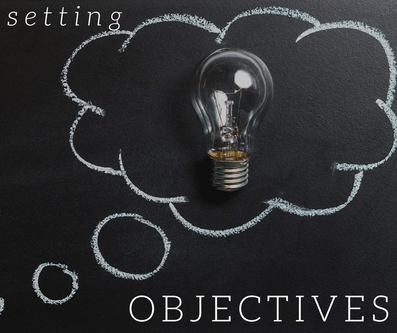 Classroom Instruction that Works (2012) gives us four recommendations for setting objectives:
The proof is in the research pudding. If we can get in the habit of posting objectives, it will be easier for us to pick activities and digital tools that pair well with our learning objectives. I hope this Classroom Instruction that Works refresher helps you in posting your objectives!
The amazing Sarah Thomas (serious guys, she's the best, and I'm not just saying that because she reads my blog), Instructional Facilitator at WRHS, shared the video below on her blog, which highlights the 6 major updates to Slides. Here's a shakedown of the updates: 1. Insert things from your Google Keep 2. Link a slide from one slideshow into another slideshow and be able to sync updates to the slide across slideshows (how many times can I say slide?) 3. Insert editable diagrams 4. Grid view lets you see all your slides in a grid 5. Skip slides lets you skip specific slides during your presentation 6. Get Add-ons (See below the video for more!) More on Add-ons If you don't know about Add-ons, they are available in a lot of the Google Apps, and essentially they are tools that add functionality to a Google App (like Flubaroo, a popular Sheets Add-on). Google Slides now has Add-on capabilities. Now, since it's new, there aren't a ton available, but you can bet the library will start growing quickly. Matt Miller of Ditch That Textbook shared a post about the Add-Ons. Here's a rundown of the best for educators: 1. Icons by Noun Project: Spice up your presentation visuals with icons 2. Shutterstock Editor: Edit the photos in your slideshow, including adding filters (*note Shutterstock also lets you buy stock photos from this Add-on, I'd just stick with the editing capabilities); you can also add emojis to your photos, so you can easily do #BookSnaps! 3. Unsplash: FREE to use photos, right within Slides (great to have students use so you don't have to worry about copyright infringement) 4. Photo Slideshow: Imports photos from your Drive; this would be GREAT for photos you want to show in a slideshow on team days or for parents! To install Add-ons, just click Add-ons within your Google Slides menu, and then Get add-ons. From there, you will see the ones available so far! So overall, these updates are terrific in adding functionality. I know I use Slides a ton, and a lot of other teachers do as well. Hopefully, you see something here you can utilize! As always, let me know how I can help! Did you know that as your Instructional Facilitator, I can help you with way more than just technology? It's true! I am here to help you teach to your full potential. As educators, we have so much on our plates, and we don't have enough hours in the day to do everything we want to. That's where I come in! Below are the areas in which we can work together. 
Insert Learning is a Chrome Extension {What is that? Find out here}. You can install it here on the Chrome Web Store. With the extension, you can insert interactive components to a website. It lets you add sticky notes, questions, highlighting, videos, and discussions, all RIGHT in the webpage. It is awesome to watch it work {if you're a nerd like me} and so I thought a quick video would be better to show you its features. You can set up classes in Insert Learning and even sync it to Google Classroom. Like many tools, there is a free and a paid version. The free version only gives you five lessons, but for something to use every now and then, that should suffice. You can delete a lesson to make room for another as well.
Want to use Insert Learning in class? Let me know how I can help, or I would love just to come to your room and see it in action! |
AuthorChristin Barkemeyer 
Archives
April 2020
Categories
All
|

 RSS Feed
