
|
One of the main reasons educators love Google is the ease in which they can manage students' work. Version History is a tool that many teachers use in several of the Google Apps to help them monitor student progress. Version History allows editors of a file to revert to previous versions of a file, restore information that has been deleted, and view who has made changes (and what the changes were) to the file. 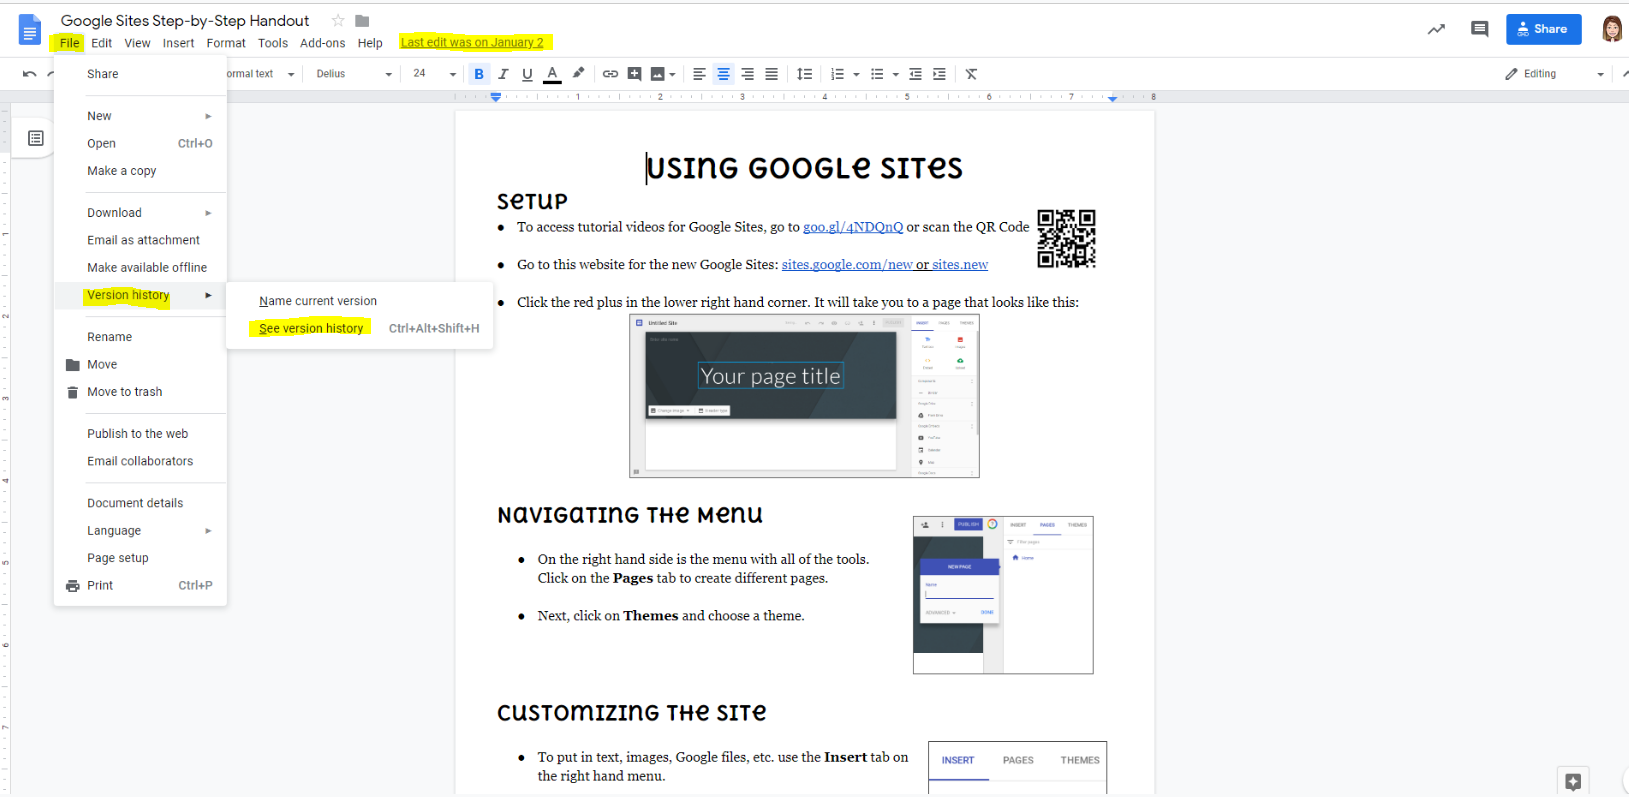 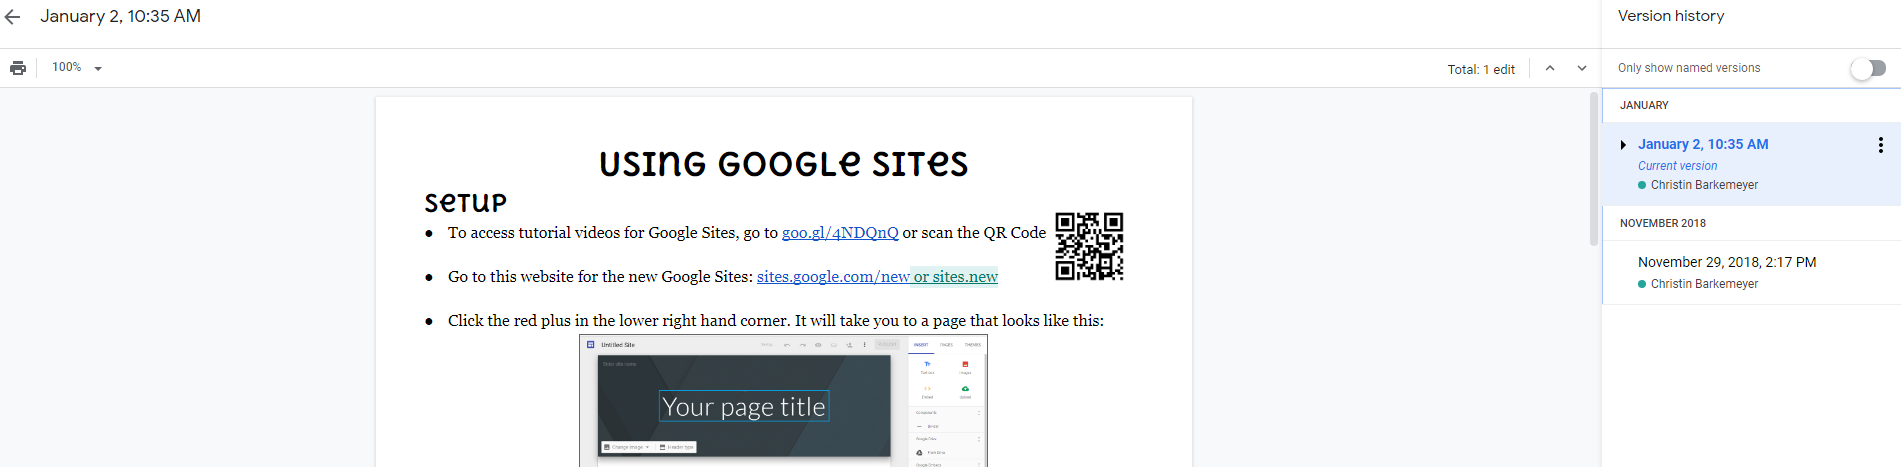 {To open Version History in Docs, Sheets, or Slides, you can click File > Version history, or you can click Last edit was...} I have used Version History in various capacities over the years. I once sorted a data spreadsheet wrong and all my data was lined up incorrectly. I didn't realize it until I left and came back to Google Sheets, so undo was not an option. Version History allowed me to go back and find the version of the file before I messed up. Crisis averted!
I used it often in the classroom as well. For collaborative activities, it's nice to be able to see who contributed what so you can provide individualized feedback. Also, students sometimes accidentally delete things they didn't mean to, and Version History lets you get it back. The most memorable time I used it was when I was doing a writing reteach one day. A student, who admittedly did not want to be working on his essay, called me over and told me he didn't know what happened, but his whole essay just up and disappeared. I went to the Version History, and said, "Hmmmm...it looks like you *accidentally* deleted it 3 minutes ago!" I restored the essay and he was able to keep working, much to his dismay. The new version of Google Sites has been sans Version History since it came out, but in 2020, this feature will begin rolling out! According to Google, by March 2020 all newly created sites will have the feature, and by the end of 2020, most existing sites should have it as well. I know educators use Sites quite a bit for group projects, so having this feature will be very handy in helping to determine who did what. For more information on Version History, click on the buttons below!
0 Comments
Last April, I wrote this post on the rollout of a great new feature: Google Slides Audio. Fast forward several months, and some people had access to the feature, and some didn't [raises hand and rolls eyes]. For whatever reason, Google paused the rollout.  However, it's finally available to those of us who didn't have it! Rapid Release domains should have it immediately and Scheduled Release domains should see it by the end of November.
Just in time for holiday party photo slideshows, amirite? Happy April, everyone! Today I wanted to let you know about an exciting update to Google Slides.  In Google's official G Suite stream of updates, they announced that Google Slides is finally getting audio! It's a slow rollout, so we don't have access yet, but hopefully it will be soon (I'm hoping by the end of April). Much like inserting an image into a slide, you will go to Insert > Audio and select a file (MP3 or WAVE) from your Google Drive. You can use music that you already have (be careful with copyright, though), or you can use free stock music. YouTube has a great library of free stock music that you can download, or if you just Google free stock music, there are many sites you can visit to find audio. Once inserted, you have options to play the audio for a specific slide, or have it run through the whole slideshow. You can adjust the volume and also have it play automatically or upon a click while in presentation mode. 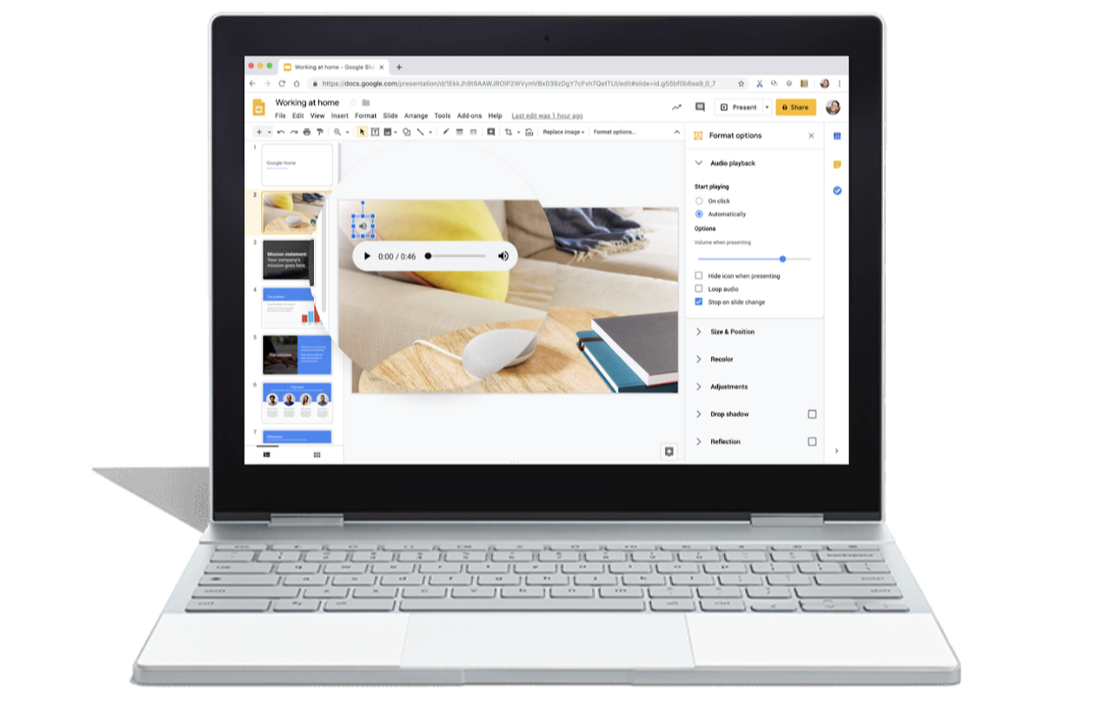 Photo from G Suite Updates This feature will be a great addition to Slides. I have had a lot of teachers ask me about how to do slideshows with photos and music toward the end of the year, so they can showcase all of the fun things that have happened throughout the year. Before, PowerPoint was a better option, but now Google Slides can be the way to go! If you pair it with the Photo Slideshow Add-on in Slides, you can easily upload photos you have saved in Google Drive or Google Photos. Each photo goes to its own slide without you having to do it manually! When you are ready to present, you can go to File > Publish to the Web and use the link they provide to have your whole slideshow playing on an automatic loop. This way you can have the music and slides play without you having to click through it! Below is a screenshot of the options you have for publishing. 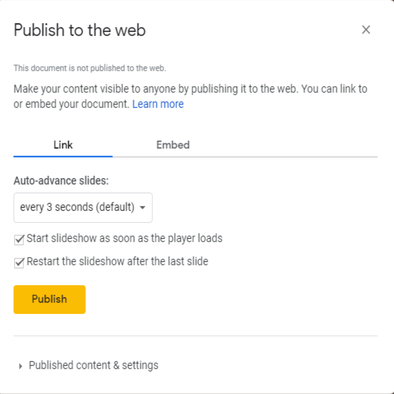 You could also have students utilize this new feature and use a screencasting tool like Screencastify or Loom to have them record their own narration along with their slides and music.
Have any other ideas of how to use this upcoming feature? Comment below! In today's post, I bring you another episode of Bloggers You Should Know, featuring Matt Miller. Not to be confused with Topeka's meteorologist, Matt Miller, this Matt Miller was, in fact, a news reporter before he came into education. He then taught high school Spanish in Indiana, and rose to fame with his first book, entitled Ditch that Textbook. Since then, he's written other books, like Ditch that Homework, and speaks at different venues around the country. He's a Google Certified Innovator and often does his blog posts around Google topics.  I have had the pleasure of seeing Matt speak. He's one of those people that makes you feel like you are buds and he really wants to help you. His blog is awesome and has so many resources for incorporating tech into the classroom. He also starting doing Ditch Summit every year around Christmas, which is a FREE PD opportunity, and you can participate from home in your PJs if you so choose, as it's a series of video interviews with different innovators from the education world.
I encourage you to go to ditchthattextbook.com and check him out. If you sign up to receive his blog posts, you'll get a free copy of his 101 Practical Ways to Ditch That Textbook e-book! I've got another cool new Google feature for you today. This one is only in beta right now, though, so it's not available to the general public yet. Read on to see how you can request early access!  Google Forms Locked Mode allows teachers to give an assessment during which students are unable to navigate away to other sites. It works on managed Chromebooks, and it's easy to do: just click a checkbox!
Now our school has a monitoring program for our Chromebooks, but to lock students into a Google Form, it's a few steps. This Locked Mode option makes it super easy to do! If you are interested in trying out Locked Mode, you can fill out this form and Google may grant you early access. The form also allows you to request access to Google for Edu's other new beta feature, an updated gradebook in Google Classroom. Both features will roll out to everyone eventually, but if you're eager to try it out, fill out the form! Happy almost Thanksgiving, everyone! I hope you truly can take a break and enjoy some relaxation with family and friends. This can be a stressful time of year as a teacher and a human in general. Make sure you are taking care of yourself!  For today's Digital Tool Tidbit, I've got two Google updates for you. My good friend and amazing science teacher, Kathryn, gave me this first one (thanks, Kathryn!). Google has released shortcuts for creating new files. Just type in any of the following URLs, and you will open up a new, blank file:
 The other update is on the Android version of the Google Classroom app. They have updated the app to include a random student selector. Last year, I wrote this post on Cold Calling and how, when used effectively, it can increase student engagement. I included a digital random student selector that teachers can use. While the tool is good, it's not the best for secondary teachers because you have to manually enter each student's name. That's not an issue with Google's student selector! Since it is housed in Google Classroom, it already pulls in your roster. Then, according to Google, you can "randomly [pick] students from your class roster. You can call on a student, skip a student to call on later, or mark a student as absent." Go to Google's Support page here to see step-by-step directions. Also, I'm sure they are already working on this for iOS, but it never hurts to click on that handy question mark at the bottom left of Google Classroom and submit feedback requesting it. Remember, they listen!!! Thanksgiving Photo from Pexels.com
Google Shortcut information from Leswing The other day I was super excited to see this email in my inbox: 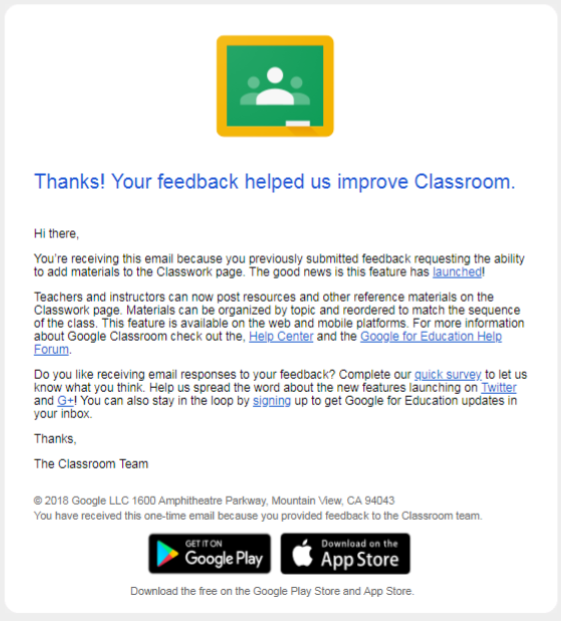 In this earlier post about the new Google Classroom updates, I mentioned that the Announcements option was now only available in the Stream. You couldn't organize it within your Classwork page, which made posting things like videos and links that accompany assignments or units very difficult. I thought Google should bring Announcements to Classwork, so I put in feedback using the little question mark at the bottom left of Google Classroom, and apparently I wasn't the only one, because Google came up with the Materials feature this last week. 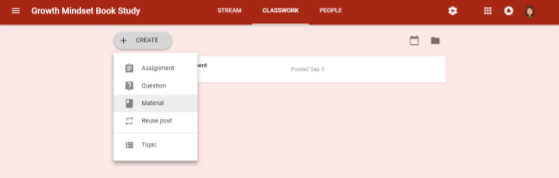 Now, you can post links, documents, videos, etc. that you want students to use but you don't necessarily want them posted as an assignment. You can organize it by topic so that the materials stay with your other content.
This just goes to show that Google really does listen to your feedback. So if there are features that are missing, let them know (like the Move to the Top feature??). I did this same thing a couple of years ago with decimal grades in Classroom, and it took them a while, but they did fix it. It's always so nice to know there is a person on the other end of the tech. Happy Almost End of the School Year, ya'll! Today's Digital Tool Tidbit is on Google Forms. I know everyone is in final countdown mode, but Google Forms will be updating soon to include some really cool changes that can help you for next year.
This article released by Google earlier this month details the changes coming. Here is a brief outline of what you'll see: 1.-2. Quiz Answer Suggestions / Autocomplete Answers: Using machine learning, Forms will now suggest answers for questions that you type in. If you're like me, you hate figuring out distractors for your questions. This will help you out a ton on that front! 3. Answer Key for checkbox and multiple choice grid questions: I've had several teachers ask me about this feature, so I am stoked it's coming! Forms will now auto-grade these types of questions. 4. Give partial credit in decimal form: This is a manual grading feature, but you'll be able to assign half or quarter credit to questions if a student only misses part of an answer. 5. Improved feedback: I honestly didn't know this feature even existed. When looking at your Responses tab, there is an Add Feedback feature that has been there for a while. If you click it, you can add a link or a YouTube video for students to use as a reteaching or extension tool. You can include text as well. The YouTube feature is what's new! 6. See your total points while creating a quiz: As you add questions and assign point values to those questions, Forms will tally the total number of points at the top of the page. Hopefully you see something on this list that will help improve your instruction and efficiency. Gotta love it when Google is responsive to teacher requests! Shout out to Mr. Heilman for passing on the info! Forms icon above from Wikimedia Commons.
Sharma, Akshat. (2018, May 10). 6 ways Quizzes in Google Forms are getting smarter. Retrieved from https://www.blog.google/topics/education/6-ways-quizzes-google-forms-are-getting-smarter/  Do you rely on your mouse for all the work you do, or are you a keyboard person? I used to be mouse all the way, but the more I use a Chromebook, the more I rely on keyboard shortcuts. It's just a very efficient way of doing things, and I'm aaalllll about efficiency, ya'll. If you aren't sure what keyboard shortcuts you have at your disposal on your Chromebook, you can hold down Ctrl, alt, + ? which will bring up this super handy keyboard menu: 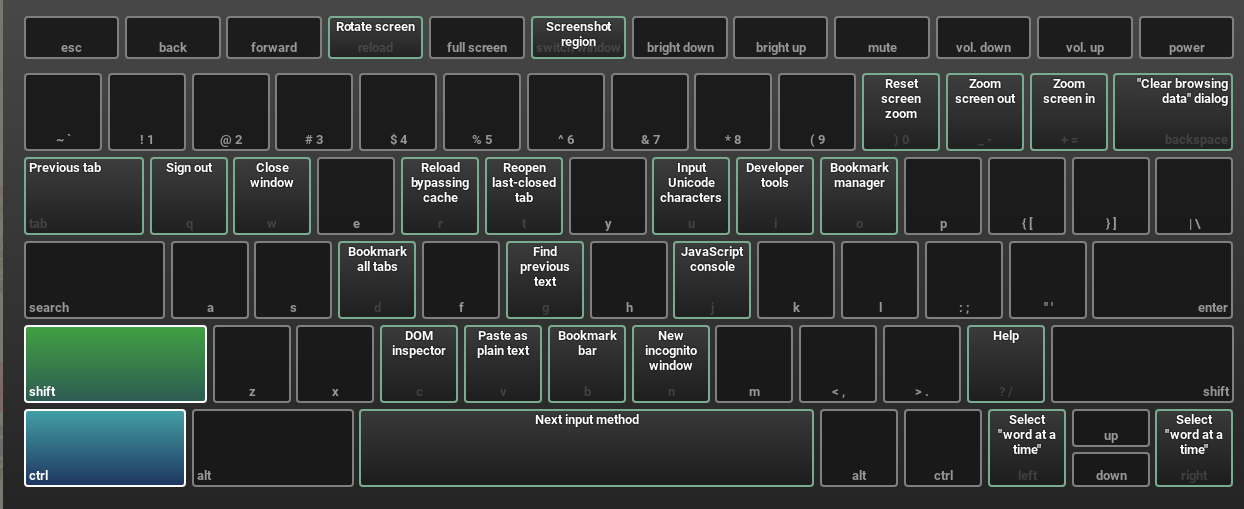 Keyboard shortcuts traditionally start with Ctrl, Shift, Alt, or a combination of two of those. Then you can hit various keys to make things happen. The menu you get by holding down Ctrl, alt, + ? lets you see what keys do what function. For example, for the screenshot above, I opened the menu and held down Ctrl + Shift. This brought up what you see in the screenshot: all the functions available by holding down Ctrl + Shift. Most people are familiar with Ctrl + c or Ctrl + v for copy and paste, but there are SO many more shortcuts out there. Here are a few of my favorites: 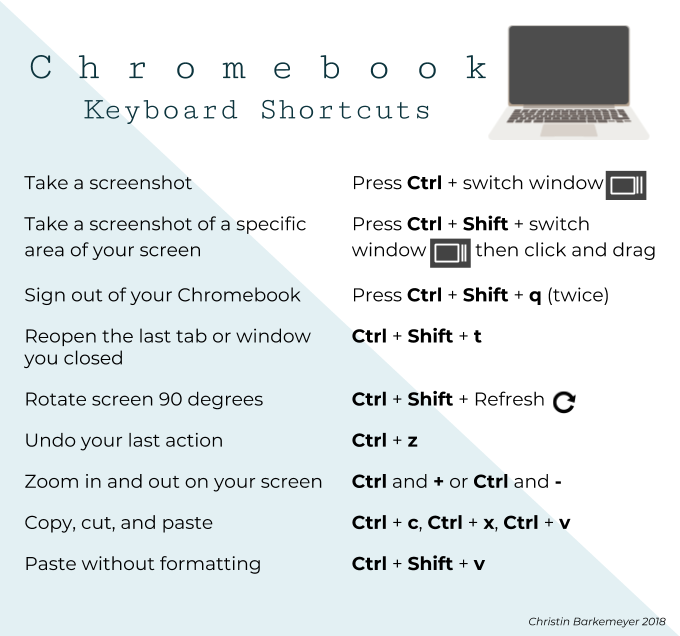 The rotate screen 90 degrees is handy to know because students often use this to make their screen spin in circles (both clever and annoying, right?). I am currently obsessed with the paste without formatting shortcut (yes, obsessed with a keyboard shortcut, I am a nerd). Say you are copying and pasting information from one Google Slide file to another. If you paste without formatting, the text will adhere to the font, size and color of the second Google Slide file, so you don't have to go through and reformat everything. It also helps when I'm doing works cited pages; I can copy and paste without formatting author names and article titles directly from websites, and I don't have to worry about them pasting in my document all huge and weird and then having to fix it. You can see all the Chromebook shortcuts by using the Ctrl + Alt + ? I mentioned above, or you can go here to see them spelled out for you. Hope you find something to make your life a little easier! Computer clipart from pexels.com
Just FYI, the first quick tip I'm going to share with you applies to a PC (Windows computer) or Mac, not your Chromebook.  The first helpful tip will allow you to access your bookmarks, apps, and extensions when using Chrome on your desktop or laptop. To do this, you just need to log in to your Chrome browser. It is very simple to do! Just see below. 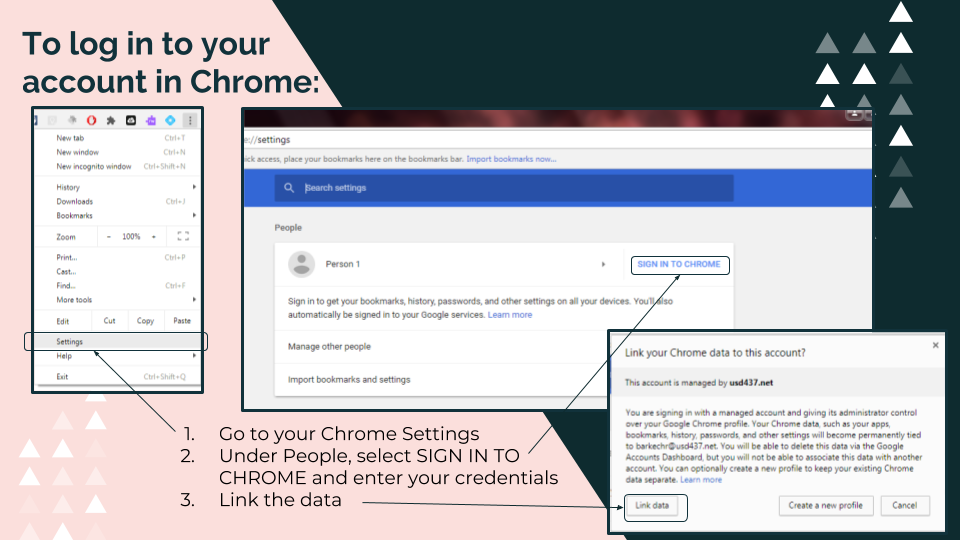 Linking the data for your account will keep your browser signed in so that if you install an extension or app on your Chromebook, it will show up on your desktop. You still have to log in to your mail and everything on your PC, but this will sync history, extensions, apps, themes, and preferences from device to device. The second helpful tip is how to manage multiple Google accounts on your computer. We all know that students need to be good digital citizens, but it is also important (more so, in my opinion!) for teachers to be good digital citizens. This tip I'm highlighting is super important to utilize if you have a personal Google account that you log into at school. Keeping your personal account and work account separate is really important, but when you just click on your icon at the top right of Gmail or Drive and Add Account, it is messy and your accounts can easily get confused. The last thing you want is to share something with someone that you didn't mean to share. The easy fix for this is the Incognito window. This is a way for you to search without saving browsing history (Note - what you do incognito is not kept from the tech. department or our internet service provider). The benefit of this is that it allows you to log in to a separate Google account. See below for the easy how-to! 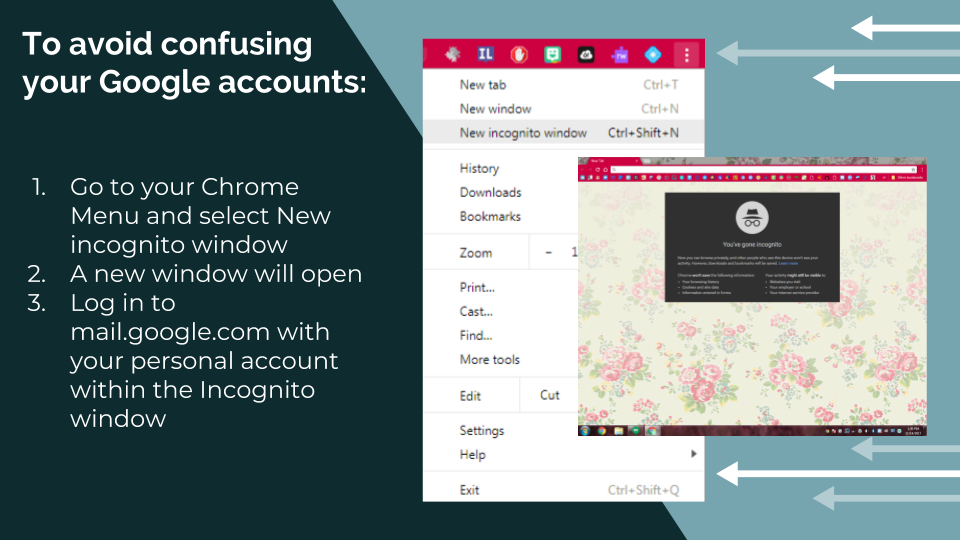 There is another really cool way to add accounts in Google. Kasey Bell of Shake Up Learning did a blog post on this if you are interested. However, the way our computers currently are set up at school, this won't work. I use it on my home computer, though, and I love it since I have three different Google accounts!
Hopefully these two simple tips will help those of us still getting our feet wet with Google. To my Google pros, any easy organizational tips you'd like to share? I'd love to hear from you! |
AuthorChristin Barkemeyer 
Archives
April 2020
Categories
All
|

 RSS Feed
