
 You may notice a couple of things about the blog. One: it's been a month since I've posted - sorry about that! I have been fortunate to have been very busy this past month. Two: I've given the blog a bit of a makeover! My husband, who works in advertising, and I came up with a new name. Welcome to IgnitEDlearning! I hope you like the change as much as I do. For today's Digital Tool Tidbit, we are talking SlidesCarnival.  (click on the image to go to the site) One of my fellow Instructional Facilitators, Teresa, introduced me to SlidesCarnival when we were working on presentations for our district mini-conference. I immediately fell in lllooovvve. In a nutshell, SlidesCarnival provides FREE Google Slides and PowerPoint templates. They are all customizable and help you to create a presentation that is visually appealing and engaging. Here are a couple of title pages for presentations I have used:
Each template also has a page with little icons that you can copy and paste anywhere in the presentation. You can change the colors of the icons as well. Plus, downloading the templates is super easy! With all this said, I'll offer a little food for thought on the idea of slide presentations. Slide presentations can be very ineffective and not allow students to learn. Slides can easily turn into a "sit and get" presentation, where students jot down notes but aren't truly engaged. I had a professor in college who literally stood at the front and read directly from her slides, adding no additional information. I tried my best to write everything down, but she went too fast for me to get everything; then one day she made the files available to us; at that point I quit writing and completely checked out.
I challenge you to make slides engaging for students, using them for discussion starters, or make them interactive, using Pear Deck or Nearpod. Use Slides for student collaboration or interactive activities, like these from Ditch That Textbook. There are so many possibilities beyond the sit and get!
0 Comments
 Do you rely on your mouse for all the work you do, or are you a keyboard person? I used to be mouse all the way, but the more I use a Chromebook, the more I rely on keyboard shortcuts. It's just a very efficient way of doing things, and I'm aaalllll about efficiency, ya'll. If you aren't sure what keyboard shortcuts you have at your disposal on your Chromebook, you can hold down Ctrl, alt, + ? which will bring up this super handy keyboard menu: 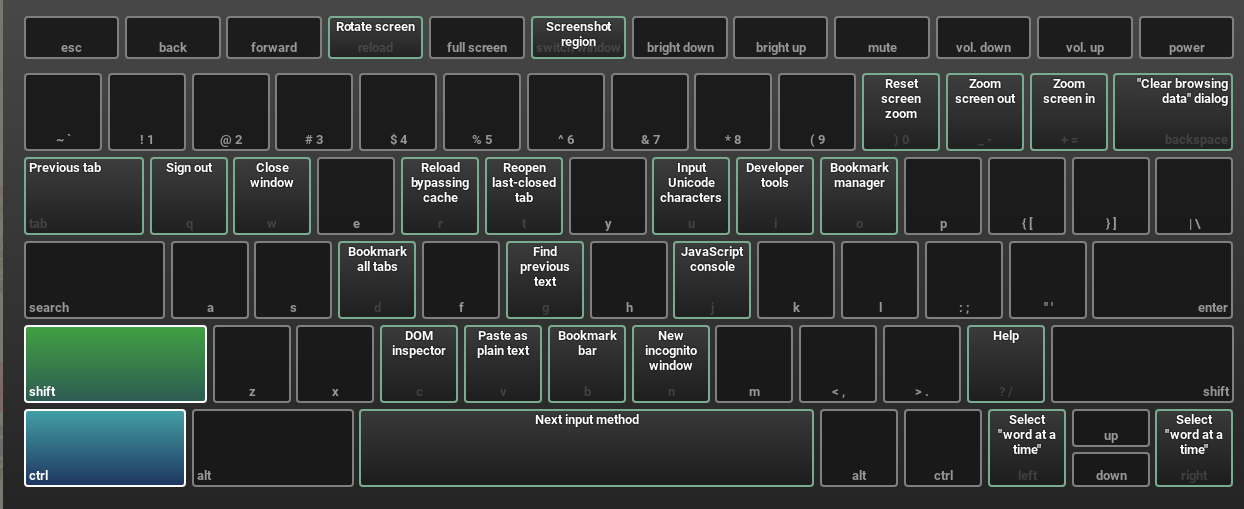 Keyboard shortcuts traditionally start with Ctrl, Shift, Alt, or a combination of two of those. Then you can hit various keys to make things happen. The menu you get by holding down Ctrl, alt, + ? lets you see what keys do what function. For example, for the screenshot above, I opened the menu and held down Ctrl + Shift. This brought up what you see in the screenshot: all the functions available by holding down Ctrl + Shift. Most people are familiar with Ctrl + c or Ctrl + v for copy and paste, but there are SO many more shortcuts out there. Here are a few of my favorites: 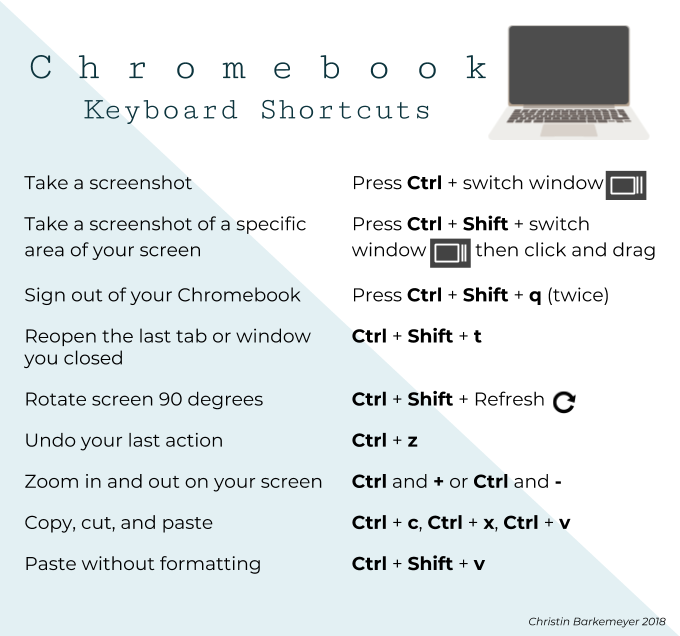 The rotate screen 90 degrees is handy to know because students often use this to make their screen spin in circles (both clever and annoying, right?). I am currently obsessed with the paste without formatting shortcut (yes, obsessed with a keyboard shortcut, I am a nerd). Say you are copying and pasting information from one Google Slide file to another. If you paste without formatting, the text will adhere to the font, size and color of the second Google Slide file, so you don't have to go through and reformat everything. It also helps when I'm doing works cited pages; I can copy and paste without formatting author names and article titles directly from websites, and I don't have to worry about them pasting in my document all huge and weird and then having to fix it. You can see all the Chromebook shortcuts by using the Ctrl + Alt + ? I mentioned above, or you can go here to see them spelled out for you. Hope you find something to make your life a little easier! Computer clipart from pexels.com
Imagine this scenario: You, the teacher, have spent hours developing a lesson that includes great, thought provoking questions. You are excited to get students involved in a class discussion. You go to execute said questions with your first class. You ask the first question. One student volunteers an answer. You ask the second question. The same student raises her hand. You say, "Come on, I know Daniella isn't the only one who has an answer to this question..." Crickets ensue. You call on another student, who responds with, "I don't know." You let Daniella answer again.  Sound any kind of familiar? I know I've had situations like this as an English teacher. So how do you get to that level of engagement where you can have a deep, meaningful conversation where all of your students participate? There are two instructional strategies that work very well together to achieve this: Think Pair Share and the Cold Call. In Think Pair Share, students have individual time to think about a problem, then work with a partner (or group) to solve it. Then students share out with the class. Letting them think gives that wait time students need to formulate an answer, and letting them work with a partner gives them the opportunity to make sure they have the best, most well thought out answer. When you are ready to have students share out their answers, the Cold Call comes in. You may be familiar with Doug Lemov's Teach Like a Champion (I know many teachers in our building use the STAR or SLANT technique). Lemov's Cold Call is when teachers "call on students regardless of whether they've raised their hands" (249). Lemov argues that this technique can truly transform a classroom. The idea is to avoid students checking out. In the scenario above, the moment Daniella raised her hand, or even when the teacher asked for someone to raise their hand and answer, most of the class checked out. There is no reason for them to think about the answer, because they do not have to participate. Cold Calling helps prevent this. If students know that there is always a possibility of the teacher calling on them, they have to be bring their A-game. Lemov gives four strategies to make Cold Calling effective: 1. Make sure it's predictable. If you use it once in a blue moon, it won't work. In fact, students may feel ambushed and become less likely to participate than before. If you have a positive classroom culture where students feel secure and you implement Cold Calling regularly, students will know it is a part of the routine. 2. Make it systematic. The best Cold Call is random. I used good old fashioned popsicle sticks in my classroom, but a great digital tool to keep Cold Calls random is the Random Name Generator on Super Teacher Tools. Just put in your rosters and the program randomly selects students with the click of a button! 3. Make sure it's positive. Cold Calling is inherently positive. You want students to be right, not wrong. It's not a good idea use Cold Calling to target students who may not be paying attention. This can call negative attention to the student, who most likely doesn't know the answer. You want students to feel comfortable with Cold Calling. There are a multitude of ways to make this happen, but I think using the Think Pair Share technique is a great way to give students a leg up with their answers. And again, classroom culture is SO important. If a student thinks everyone will think they are "dumb" if they don't know the answer, they won't want to participate. If they know it's ok to make mistakes and learn from them (Growth Mindset!) then they won't be as timid about participating. 4. Unbundle it. It's better to unbundle a larger question into several smaller questions, or to scaffold the level of questioning, so that you can Cold Call multiple students and increase engagement overall. I tried to find a good YouTube video that showed Cold Calling in action, but all the ones I found were lacking wait time for the whole class. For example, the teacher would ask, "What is the square root of 4, Jennifer?" Yes, you've randomly called on Jennifer, but now the other students don't have a reason to work through the problem for themselves. Instead, asking, "What is the square root of 4?" providing wait time, and then calling on Jennifer would provide more engagement for all students. I encourage you to try Think Pair Share with the Cold Call in your classroom if you aren't already doing it. I hope you'll be pleasantly surprised at the level of engagement you achieve! Works Cited
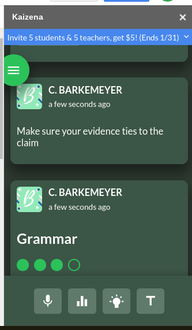
Lemov, Doug. Teach Like a Champion 2.0. Jossey-Bass, 2015. Photo from Pixabay You may notice that Digital Tool Tuesday is now Digital Tool Tidbits. As the year has progressed I've gotten busier and busier (which is AWESOME!), and I grew a bit tired of having to rush posts in order to get them posted on a Tuesday. Also, I am hoping to blog more about a variety of things in general; hence the name change!  Today's digital tool is a Google Docs Add-on called Kaizena. Kaizena has been around for a while, and I had heard about at some point and obviously signed up for it because I get their emails, but I had never actually used it. Anyhoo, Kaizena just recently fully integrated with Google as a Docs Add-on, and it is an excellent way to provide effective feedback to students (hello again, Classroom Instruction that Works). One method of feedback that Kaizena allows you to provide is comments, much like Google Docs already does, but you can color-code your comments for easier identification. But the best feedback you can provide with Kaizena are the things that Docs doesn't already have. You can do voice comments, add a lesson, and track a skill. 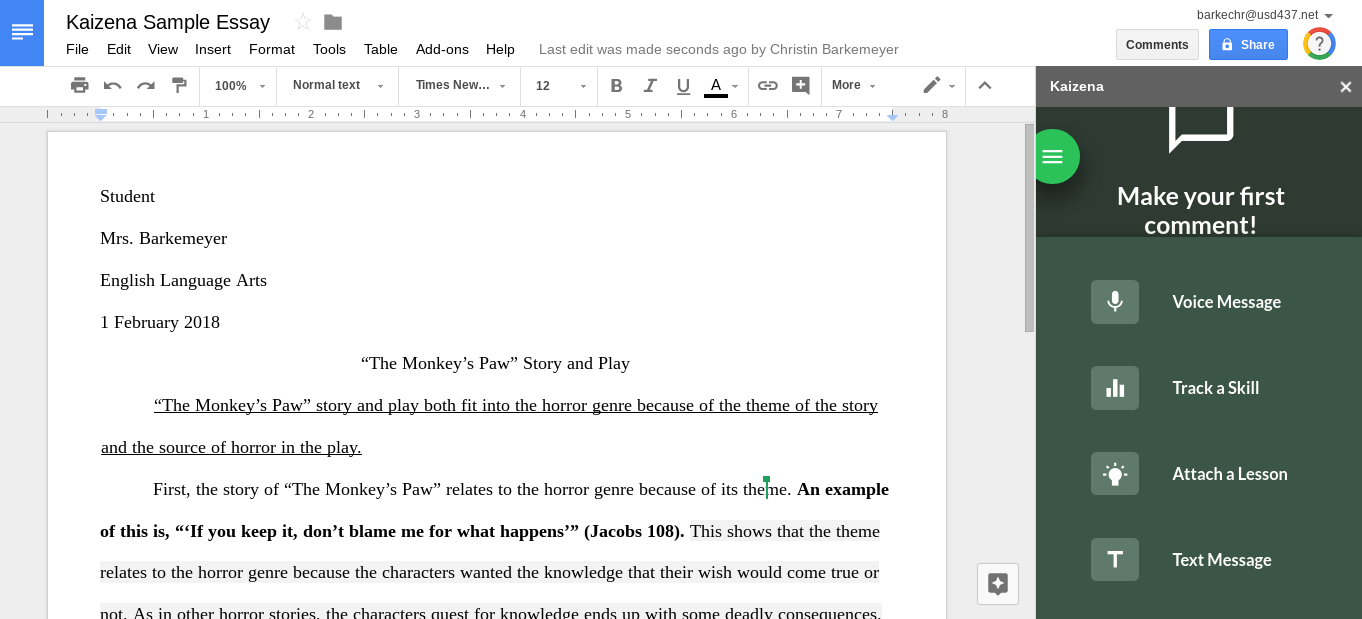 To begin with, the Voice Message option is pretty awesome. Personally, if I can talk out my feedback to a student rather than have to type it or write it, I know I am going to leave much better feedback. Kaizena makes it easy to do that.
The Skills option allows you to put rubric items within your comments. Each skill is like an item on a rubric. You can set the different levels and then grade student work based on the levels. For example, if you put grammar as a skill (as seen above) you can give a student a rating for how well they did on grammar. Want to get started using Kaizena? Click here to install the Google Docs Add-on (students will need the Add-on as well, but it can be pushed out from your tech. administrator). Then, this help page from Kaizena's website provides you with a ton of useful information to help you as the teacher get started, and this one is great for students when they are ready to review their feedback!
Humans in general have short attention spans, but today's students have a particularly hard time staying focused. Dr. Judy Willis, MD, (2016) a neurologist and classroom teacher (how cool is that, by the way?!) emphasizes the need for a break: "Brain breaks should take place before fatigue, boredom, distraction, and inattention set in....As a general rule, concentrated study of 10 to 15 minutes for elementary school and 20 to 30 minutes for middle and high school students calls for a three- to five-minute break." So asking students to stay completely focused for long chunks of time without a break might be too much for them to handle.  GoNoodle is an easy way to implement brain breaks in your classroom. It has been around for a long time, and is marketed more for elementary students, but there are so many videos on their site that work for middle school and even high school students. GoNoodle has different activities of varying lengths. They have activities that you can use at the start of the day (good for those who have first hour classes that don't seem quite awake), and they have ones you can use in the middle of class to give students a brain break. Now, of course, I would advocate for the teacher and all students to participate. Having said that, I know not everyone is comfortable making a complete fool of themselves (both teachers and students included). Luckily, there are activities that range from the cheesy to the not-so-cheesy and from the complicated to the easy-peasy. You really can tailor it to meet the needs of your students, which is great. An alternative to GoNoodle is just going to YouTube and searching for brain breaks, but the GoNoodle site is nice because you easily can find videos by categories (i.e. Cross Lateral Skills, Enhance Focus, or Brainercise) and it keeps track of your progress. GoNoodle does have a YouTube Channel that is really well organized, too. Overall, the key here is to make sure we are giving students time to focus and re-energize, even if it's just for a minute or two! Any other ideas for how to give students' brains a break? Comment below! Professional Standards
Standard 2: Impact on Student Learning Standard 4: Grow and Develop Professionally
Today's Digital Tool Tuesday comes to you as a result of a morning in which my patience was tested and I had to repeat the mantra, "If at first you don't succeed, try, try again" (and again, and again). I was creating a Google Slides presentation on how to connect a Chromebook to the projector, and I wanted to use GIFs to give a good nonlinguistic representation of how to do the steps (What is a GIF? See image below!).
I read several blog posts and did several Google searches on GIF creators, but everything that I tried would not work the way I needed it to. I needed to put the GIFs in Google Slides, which you do by going to Insert --> Image --> By URL, and then you paste the URL of the GIF in the box. The GIF creators I found downloaded the GIF, rather than give me a URL, or they just plain glitched out on me. Around and around I went, until VICTORY! I found one that did what I needed it to do.
Gifs.com. Yes, really, it's that simple! GIFs.com let's you turn videos into GIFs. You can upload your own video (I was able to do use the shareable link of a video from Screencastify to make the above GIF), or just copy and paste a YouTube video into the site and go from there.
It lets you adjust the length of time of your GIF and add features like a title.
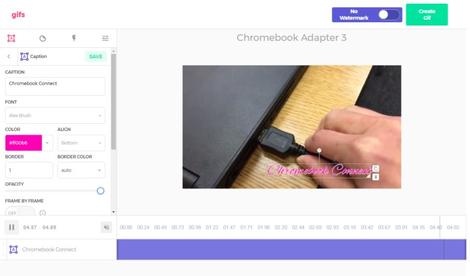
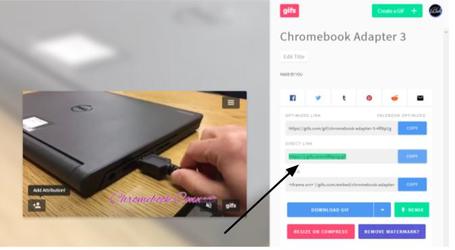
Once you are done editing, you get a Direct Link, which you then can copy and paste into Google Slides (or Docs, or Drawings) under Insert --> Image --> By URL.
So how can you use GIFs in your classroom?
The amazing Sarah Thomas (serious guys, she's the best, and I'm not just saying that because she reads my blog), Instructional Facilitator at WRHS, shared the video below on her blog, which highlights the 6 major updates to Slides. Here's a shakedown of the updates: 1. Insert things from your Google Keep 2. Link a slide from one slideshow into another slideshow and be able to sync updates to the slide across slideshows (how many times can I say slide?) 3. Insert editable diagrams 4. Grid view lets you see all your slides in a grid 5. Skip slides lets you skip specific slides during your presentation 6. Get Add-ons (See below the video for more!) More on Add-ons If you don't know about Add-ons, they are available in a lot of the Google Apps, and essentially they are tools that add functionality to a Google App (like Flubaroo, a popular Sheets Add-on). Google Slides now has Add-on capabilities. Now, since it's new, there aren't a ton available, but you can bet the library will start growing quickly. Matt Miller of Ditch That Textbook shared a post about the Add-Ons. Here's a rundown of the best for educators: 1. Icons by Noun Project: Spice up your presentation visuals with icons 2. Shutterstock Editor: Edit the photos in your slideshow, including adding filters (*note Shutterstock also lets you buy stock photos from this Add-on, I'd just stick with the editing capabilities); you can also add emojis to your photos, so you can easily do #BookSnaps! 3. Unsplash: FREE to use photos, right within Slides (great to have students use so you don't have to worry about copyright infringement) 4. Photo Slideshow: Imports photos from your Drive; this would be GREAT for photos you want to show in a slideshow on team days or for parents! To install Add-ons, just click Add-ons within your Google Slides menu, and then Get add-ons. From there, you will see the ones available so far! So overall, these updates are terrific in adding functionality. I know I use Slides a ton, and a lot of other teachers do as well. Hopefully, you see something here you can utilize! As always, let me know how I can help!
Insert Learning is a Chrome Extension {What is that? Find out here}. You can install it here on the Chrome Web Store. With the extension, you can insert interactive components to a website. It lets you add sticky notes, questions, highlighting, videos, and discussions, all RIGHT in the webpage. It is awesome to watch it work {if you're a nerd like me} and so I thought a quick video would be better to show you its features. You can set up classes in Insert Learning and even sync it to Google Classroom. Like many tools, there is a free and a paid version. The free version only gives you five lessons, but for something to use every now and then, that should suffice. You can delete a lesson to make room for another as well.
Want to use Insert Learning in class? Let me know how I can help, or I would love just to come to your room and see it in action! This week's Digital Tool Tuesday is on Let's Recap. If you were in Classroom Instruction that Works training at the beginning of the year, you may remember FlipGrid. Let's Recap is a lot like FlipGrid, but it has a few features that set it apart.  Let's Recap is a digital tool that allows students to engage in reflection and discussion via videos and typed responses. The thing I like best about Let's Recap is the ability to create classes, or "queues," as they call them. That way, you can have each hour in a different queue and the videos are not dumped all in one place. This would make for better organization for grading. The free version of Flipgrid only gives you one "grid" to use for your whole student load.
In Let's Recap, students can type in responses to questions that you pose, or they can post video responses. You can have students share their video just with the teacher or with the whole class. You also can have up to 10 questions in a post for students to respond to. If you wanted, they could do a video response for every question! Let's Recap has Google Classroom integration, which is always a plus! Having students post videos as reflections or discussion is a great way to get them thinking about the topics you are covering in class, and Let's Recap and FlipGrid both provide an easy way for teachers to do so. Want to use Let's Recap or FlipGrid in class, but need some help? Let me know!   Happy Digital Tool Tuesday, Wednesday Edition! Let's face it, most of us think today is Tuesday, anyway, right?
Today's tool is Quizizz. If you have never used Quizizz before, you may have used its mom and dad, Kahoot and Quizlet (if you haven't, fear not, resident tech guru Whitney will be presenting on Kahoot at our Sept. PD day!). These tools are not affiliated with each other, but are very similar. So why, you may ask, would you want to use Quizizz if Kahoot and Quizlet are working just fine for you? Let me explain! Quizizz is great for fun, interactive reviews of material, just like Kahoot and Quizlet. One of the big differences is that you can assign a Quizizz quiz as "homework" and then you can integrate it with your Google Classroom. This allows students to review the material at home, not just in class, like Quizlet, but it is still using the fun platform like Kahoot does, marrying the best of the Kahoot and Quizlet worlds. In addition, students can see the answer choices on their devices, whereas with Kahoot they only see shapes that coordinate with what is on the teacher's board. This may be better for students who have processing delays and cannot hang with their peers during Kahoot because it takes them longer to figure out the answers. You still get the data after the quiz. And, Math and science teachers, they even have a character map where you can put in Greek symbols, superscripts, subscripts, etc. The setup and design is similar to Kahoot. One thing I really like is that you can preview the student side of things on half the screen while seeing what your half looks like as the teacher. The quizzes also use memes throughout, which makes learning fun for students. Need help getting started? Let me know how I can help, or visit the Resources page of Quizizz! |
AuthorChristin Barkemeyer 
Archives
April 2020
Categories
All
|


 RSS Feed
